Are you thinking of exploring space with your children? Need some new ideas? Then look no further, check out these ideas below:
1) Attach fairy lights to your ceiling and cover them over with black backing paper, pushing them through to create the night sky. If you are able try to push them through in patterns to create some of the simpler constellations for the children to learn.
2) Make rockets from kitchen roll tubes and insert an electrical circuit to make them light up. If you use orange / red / yellow cellophane for the flames the light will make it glow beautifully.
3) Wish upon a star - draw a large star and tail for the children to decorate. Get them to write what they would wish for and why and hang it underneath.
4) Follow this link http://www.enchantedlearning.com/crafts/astronomy/solarsystemmodel/to see how to make a solar system mobile.
5) Use kitchen foil and cocktail sticks to make astronauts that can float in space or be pinned to your wall display. Scrunch the foil to mould into the various body parts and secure together using the cocktail sticks and sellotape, but try to have as few separate pieces as possible.
Monday, March 30, 2009
Sunday, March 22, 2009
Bumble Bee Mobile
Here's an idea I found on www.craftsfor kids.com - follow the link to go and see more.
Take a buzz through the garden with a honey bee mobile. Did you know that bees can fly 22 miles per hour and their wings beat 180 beats per second? You'll really need to be "buzzing" to keep up with them. Bees unwittingly carry pollen on their back legs from flower to flower so that the plant can produce seeds for the next crop.
You will nee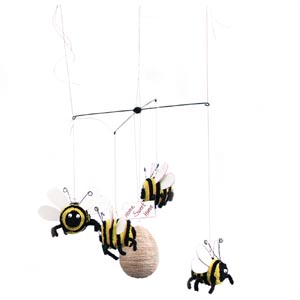 d:
d:
Take a buzz through the garden with a honey bee mobile. Did you know that bees can fly 22 miles per hour and their wings beat 180 beats per second? You'll really need to be "buzzing" to keep up with them. Bees unwittingly carry pollen on their back legs from flower to flower so that the plant can produce seeds for the next crop.
You will nee
d:- 4 Styrofoam 2" eggs
- 3" Styrofoam egg
- 24 Yellow 6mm chenille stems
- 18 Black 6mm chenille stems
- Wiggle eyes
- Black craft wire
- Jute
- 16 large wood teardrops
- 2 Small wood rectangles
- White acrylic paint
- Paint brush
- Glue
- Nylon thread
- 18 gauge Wire stem
- Wire snips
Instructions:
- Wrap each 2" styrofoam egg with yellow chenille stems. Starting at the widest part of the egg, push one end of a stem into the styrofoam then wrap the chenille between the yellow for stripes. To cover each end, form black chennile stem into a circle. Bend the ends outward then attach one circle to each end of the egg by pushing the ends into the body. Secure with glue.
- Cut one chenille stem into 6 pieces. Push ends into the body then bend to make legs.
- Paint the wood teardrops white. Let dry then push the pointed ends of four teardrops into each bee. To make antennae, cut 6" piece of craft wire. Fold in half then twist together. Curl each end around a paintbrush handle. Fold in half then push head. Glue wiggle eyes in place.
- Unbend four paperclips. Push one into the top of each bee for a hanger.
- Unbend a paperclip then push into the pointed end of the large styrofoam egg. Tie end of jute to the clip. Cover part of the egg with glue, then wrap the egg completely with jute keeping strands close together. Paint the rectangles white. Let dry then write "HOME SWEET HOME" on one side with the black marker.
- To assemble, cut the wire stem in half then tie the two pieces together at the center to make a cross. Curl each end to make a hook. Tie invisible thread to each bee then tie the opposite ends to the ends of the wire. Tie the beehive to the center of the crossed wires. Glue the rectangles together on either side of the thread with the lettering to the outside.
Sunday, March 15, 2009
Woven Fish Mobiles
Use this fish as part of a sea / underwater theme, as a fun recycling project or incorporate it into a rainforest project.
Promote recycling with fun activities that use the humble plastic bag!

Woven fish mobiles
You will need: a selection of different coloured plastic bags; sticky tape; scissors; card; glue; thread and drawing materials.
What to do:
1. Each child will need four bags in a variety of colours. Remove the handles and cutting down the sides to make oblongs around 70×30cms. To save time, ask your TA to cut these lengthways into long strips roughly 5–6cms wide. Each child will need around 20 strips.
2. Decide on an appropriate colour sequence and place half the plastic strips horizontally in close rows on a large flat surface. Secure the loose short ends to the surface with sticky tape.
3. At right angles, lie the remaining strips vertically on top of the horizontal ones in preparation for weaving. Ensure that a few inches of loose ends remain on all four sides. Attach the top of the vertical strips to a long piece of card.
4. Thread the top strips over and under the bottom ones in alternate rows. Keep the weaving flat – not pulling too tight – and ensure that the ends are long enough on each side so as to not come undone.
5. When completed, remove the sticky tape securing the short ends to the work surface. Lift the card and gently fold the weaving in half (top to bottom). Remove the card and tie pairs of ends together along the bottom edge.
6. Carefully gather the loose strips emerging from one end (left or right) and secure these together with a big knot – leaving the ends to dangle. Secure the other ends neatly with sticky tape. The weaving should now resemble a fish, with dorsal fins composed of individual ties and a streamer-like tail made up of separate strips gathered together by one knot.
7. Ask the children to make a fish head out of card and glue it in place. Use thread to dangle the fishes around the classroom.
Tuesday, March 10, 2009
Butterfly Mobiles
These butterfly mobiles are so quick and easy to make and look really effective fluttering in the breeze as they hang from your ceiling.
1) Buy some wooden clothes pegs and get the children to colour them with brown felt tips.
2) Choose 2 colours of tissue paper and draw 2 largish hearts opposite each other that join together at the point.
3) Ask the children to cut them out and lay them one on top of the other.
4) Twist them together at the centre - this creates your wings.
5) Open your coatpeg and push the wings in, then fluff them out to look more realistic.
6) Either use brown/black coloured pipe cleaners or colour white ones appropriately. Curl one end and glue the straight ends to the straight end of the clothes peg to make your feelers.
7) Use the clear nylon thread to suspend them from your ceiling / tree branches.
These work really well with a summer / minibeasts / lifecycles /rainforest project.
Thursday, March 5, 2009
Sssssnakes !
Add some colourful snakes to your rainforest boughs! These are ssssoo easy to make and look bright and decorative too:
1) Use a brightly coloured pair of tights (striped or patterned are good) and stuff with newspaper or soft recyclable material.
2) Glue some 'googly' eyes on the snake's head. *
3) Cut out and attach a red felt forked tongue.
*As a twist on this one year I made small electrical circuits and put these in for the snake's eyes so that they literally glowed!
1) A CDT option is to cut kitchen rolls into circles 1" wide and paint about 12 of them for 1 snake. 2) For the head use a polystyrene / ping pong ball and paint it.
3) Stand card circles in a line and thread string through.
4) Space card circles slightly apart and sellotape string to top inside card and to snake head.
5) This makes a flexible snake that can also be turned into a puppet by adding 2 sticks at either end.
Subscribe to:
Posts (Atom)